【ROS2实战】ROS 2 Humble 使用 rosbridge_server 搭建 WebSocket Bridge 并与网页通信
发表于更新于
阅读量: 北京
【ROS2实战】ROS 2 Humble 使用 rosbridge_server 搭建 WebSocket Bridge 并与网页通信
赵洲洋
ROS 2 Humble 使用 rosbridge_server 搭建 WebSocket Bridge 并与网页通信
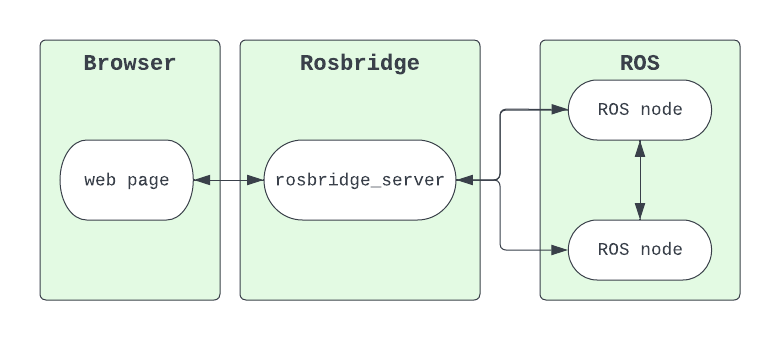
本教程介绍如何在 ROS 2 Humble 中安装并使用 rosbridge_server 搭建 WebSocket 接口,使网页客户端能够通过 WebSocket 与 ROS 2 通信(发布、订阅 topic)。适合用于远程控制、网页仪表板等场景。

📦 一、安装 rosbridge_server
确保已安装 ROS 2 Humble:
1
2
3
4
5
6
7
8
9
10
11
| sudo apt update
sudo apt install ros-humble-rosbridge-server
````
---
```bash
source /opt/ros/humble/setup.bash
ros2 launch rosbridge_server rosbridge_websocket_launch.xml
|
默认监听地址为:
如果你在远程设备上运行,请确保防火墙或网络开放 9090 端口。
🌐 三、最简单的 HTML 页面测试 WebSocket 连接
创建一个 index.html 页面,内容如下:
1
2
3
4
5
6
7
8
9
10
11
12
13
14
15
16
17
18
19
20
21
22
23
24
25
26
27
28
29
30
31
32
33
34
35
36
37
38
39
40
41
42
43
44
45
46
47
48
49
50
51
52
53
54
55
| <!DOCTYPE html>
<html>
<head>
<title>ROS2 WebSocket Test</title>
<script src="https://zhaozhouyang.oss-cn-beijing.aliyuncs.com/blog/202505/roslib.min.js"></script>
</head>
<body>
<h1>ROS2 WebSocket Bridge Test</h1>
<button onclick="sendCommand()">发送 /test_cmd</button>
<script>
const ros = new ROSLIB.Ros({
url: 'ws://localhost:9090'
});
ros.on('connection', () => {
console.log('连接成功');
});
ros.on('error', (error) => {
console.error('连接错误: ', error);
});
ros.on('close', () => {
console.log('连接关闭');
});
const testTopic = new ROSLIB.Topic({
ros: ros,
name: '/test_cmd',
messageType: 'std_msgs/String'
});
function sendCommand() {
const msg = new ROSLIB.Message({
data: 'Hello from Browser'
});
testTopic.publish(msg);
}
const replyTopic = new ROSLIB.Topic({
ros: ros,
name: '/test_reply',
messageType: 'std_msgs/String'
});
replyTopic.subscribe((message) => {
console.log('收到消息:', message.data);
});
</script>
</body>
</html>
|
🔁 四、命令行与网页的双向验证
✅ 1. 网页 → ROS 2
网页点击按钮后会向 /test_cmd 发布消息:
1
2
|
ros2 topic echo /test_cmd
|
能够收到如下消息:
✅ 2. ROS 2 → 网页
在终端手动发布消息到 /test_reply:
1
| ros2 topic pub /test_reply std_msgs/String "data: 'Hi from ROS 2 CLI'"
|
能够看到会持续发送消息:
查看网页控制台输出,应该可以看到 "Hi from ROS 2 CLI"。
⚙️ 五、设置 rosbridge_server 开机自启动
方法一:使用 systemd 配置服务(推荐)
- 创建文件
/etc/systemd/system/rosbridge.service:
1
2
3
4
5
6
7
8
9
10
11
12
13
14
| [Unit]
Description=ROS 2 WebSocket Bridge (rosbridge_server)
After=network.target
[Service]
Type=simple
ExecStart=/bin/bash -c "source /opt/ros/humble/setup.bash && ros2 launch rosbridge_server rosbridge_websocket_launch.xml"
Restart=on-failure
User=你的用户名
WorkingDirectory=/home/你的用户名
Environment=ROS_DOMAIN_ID=0
[Install]
WantedBy=multi-user.target
|
- 启用服务:
1
2
3
4
| sudo systemctl daemon-reexec
sudo systemctl daemon-reload
sudo systemctl enable rosbridge
sudo systemctl start rosbridge
|
- 检查服务状态:
1
| sudo systemctl status rosbridge
|
📝 六、总结
- 使用
rosbridge_server 提供 WebSocket 接口,可以让网页、移动端轻松与 ROS 2 通信。
roslibjs 是官方支持的 JS 库,使用简单。- HTML 页面可以双向收发消息。
- 通过 systemd 可设置 rosbridge 自动启动。